Wednesday, July 18, 2012

Recipe: Easy Roasted Beets


Just took the last of the beets out of the garden yesterday. This got me thinking that we should post about how we usually use them up. Typically we roast them in the oven. There are many ways to roast beets, which seem to be the super food du jour, but as with all things we favor the simple method. This recipe roasts the beets with the skin on and doesn't require par boiling or making foil packets, etc.

Supplies:
Knife and cutting board
Bowl
Spoon
Baking sheet

Ingredients:
Beets (lots or only a few)
Olive oil (or oil of your choice)
*Sea salt

*Optional but gives it a nice flavor

Instructions:
1. Preheat your oven to 425 degrees.

2. Take your fresh from the garden (or wherever) beets and cut off the beet greens (but don't throw them out--we'll do a beet green recipe as a future post).

3. Scrub up the beets to get all the dirt off. (If you clean them before you cut off the beet greens be sure not to get the greens too wet; they will last longer in the fridge if they stay dry).

4. After they are all cleaned up cut them into small pieces. The Cylindras (red ones in pic above) we cut into medallions since their shape makes them so easy to cut, but the Goldens we tend to cut into little quarter sections. The smaller the pieces the faster they will cook. 

5. Put your cut up beets into a large bowl and drizzle olive oil over them. Mix with a spoon so each piece is more or less covered and then spread them out onto your baking sheet.  If you are plan to use salt, then take your sea salt grinder and sweep it quickly across your beets now (or just lightly sprinkle by hand).

6. Put sheet in the oven and bake for 30-45 minutes or until you can easily pierce with a fork. If you are only doing a few beets reduce the cooking time and check them often. When you take them out they will look a bit shriveled and reduced in size.

7. Try and get them to the table before you eat them all right off the baking sheet.

Enjoy!


Also featured on Gnowfglins Simple Lives Thursday

Thursday, July 12, 2012

Use Homemade Seed Tape to Pre-Plan Your Fall Garden


I mentioned a few months ago that we were going to test out making our own seed tape following Garden Betty's instructions. We tried it with a single row of Golden Beets, and it was an astounding success (see here for pics). Not only did it make sowing seed much easier (no accidental volunteer seeds falling into other rows), but I think it actually helped improve our germination rate.

Since we are actually expecting a baby any day now and will not have as much time to devote to the garden the rest of the summer, it dawned on me that I could make seed tape ahead of time for all of our fall garden sowings to make it easy to plant what we want quickly and efficiently (especially when we are highly sleep deprived with a newborn).

After making all this tape, I realized this could be a great overall garden planning tool for anyone because it makes you really think through what you are going to plant and what you can actually fit in your garden and allows you to prepare ahead of time. Some people have no problems with this but we are newer to gardening and still screw things up from time to time.

Why do this when it is so time consuming and you can just direct sow into the garden? Here are a few reasons:

  • It forces you to plan out your space precisely. Helpful for those of us who tend to think they have a way bigger garden then they actually have and who rudely realize this after they have planted too much of something and have run out of space for other things.
  • It makes sowing easier since you only have to scoop out a little trench the right depth, throw the tape on it, and cover it with the soil. We found this a bit more back saving then normal sowing and MUCH quicker. 
  •  It helps you plant things with consistent spacing, and if you are careful, at a consistent depth. This makes your rows look neat and tidy and improves your germination since you didn't accidentally sow one seed 1/2" deep when you should have sown it 1/4" deep. 
  • It aids germination because the paper helps keep seeds moist. This is particularly helpful for seeds that are garden princesses like carrots and parsnips that refuse to germinate if they are not kept comfortably moist in the beginning. 

  • It makes succession planting a breeze because you can tear however much tape you want to plant at one time and save the rest for a later planting. Again, of course you can do this with seeds, but I know we at least never end up doing succession planting because sowing is already time consuming and we don't want to do it twice or we forget to bring the right seeds to the garden. 
  • It allows you to prepare things ahead of time if you know you will be strapped for time at a certain point in the season (like if you are having a baby for example) or if it is winter and you want something garden-related to do.

Convinced? Then just follow the steps below.

Step 1: Planning Phase--Get out all the seeds you want to plant for your summer or fall garden. Figure out what you want to go in which garden bed and then use the row distance measurements provided on the seed packets to figure out how many rows of seed tape you will be able to fit your space. To help me, I drew out a picture of my beds and how much could fit where. (For example, my big bed is 8'x 8' but I have beams in a t-shape that we walk on so in each square I can fit seed tape lengths that are about 3 1/3 ft long.)


Step 2:  Planning Phase cont'd-- On another piece of paper, take the measurements you just figured out and write down how many pieces of seed tape you need to make in each size. Then under each size, write down what kinds of seed tape you plan to make (ex, 1 carrot, 1 pak choi, etc) and how far apart the seeds should be spaced. (For example, in the 3 1/3 ft tape I needed to make 2 lengths of Japanese Red Mustard Greens and the seeds should be spaced 6" apart on the tape.) I also found it helpful to include when I planned to sow this in the garden since this helps you sort the tape later when you go to store it.


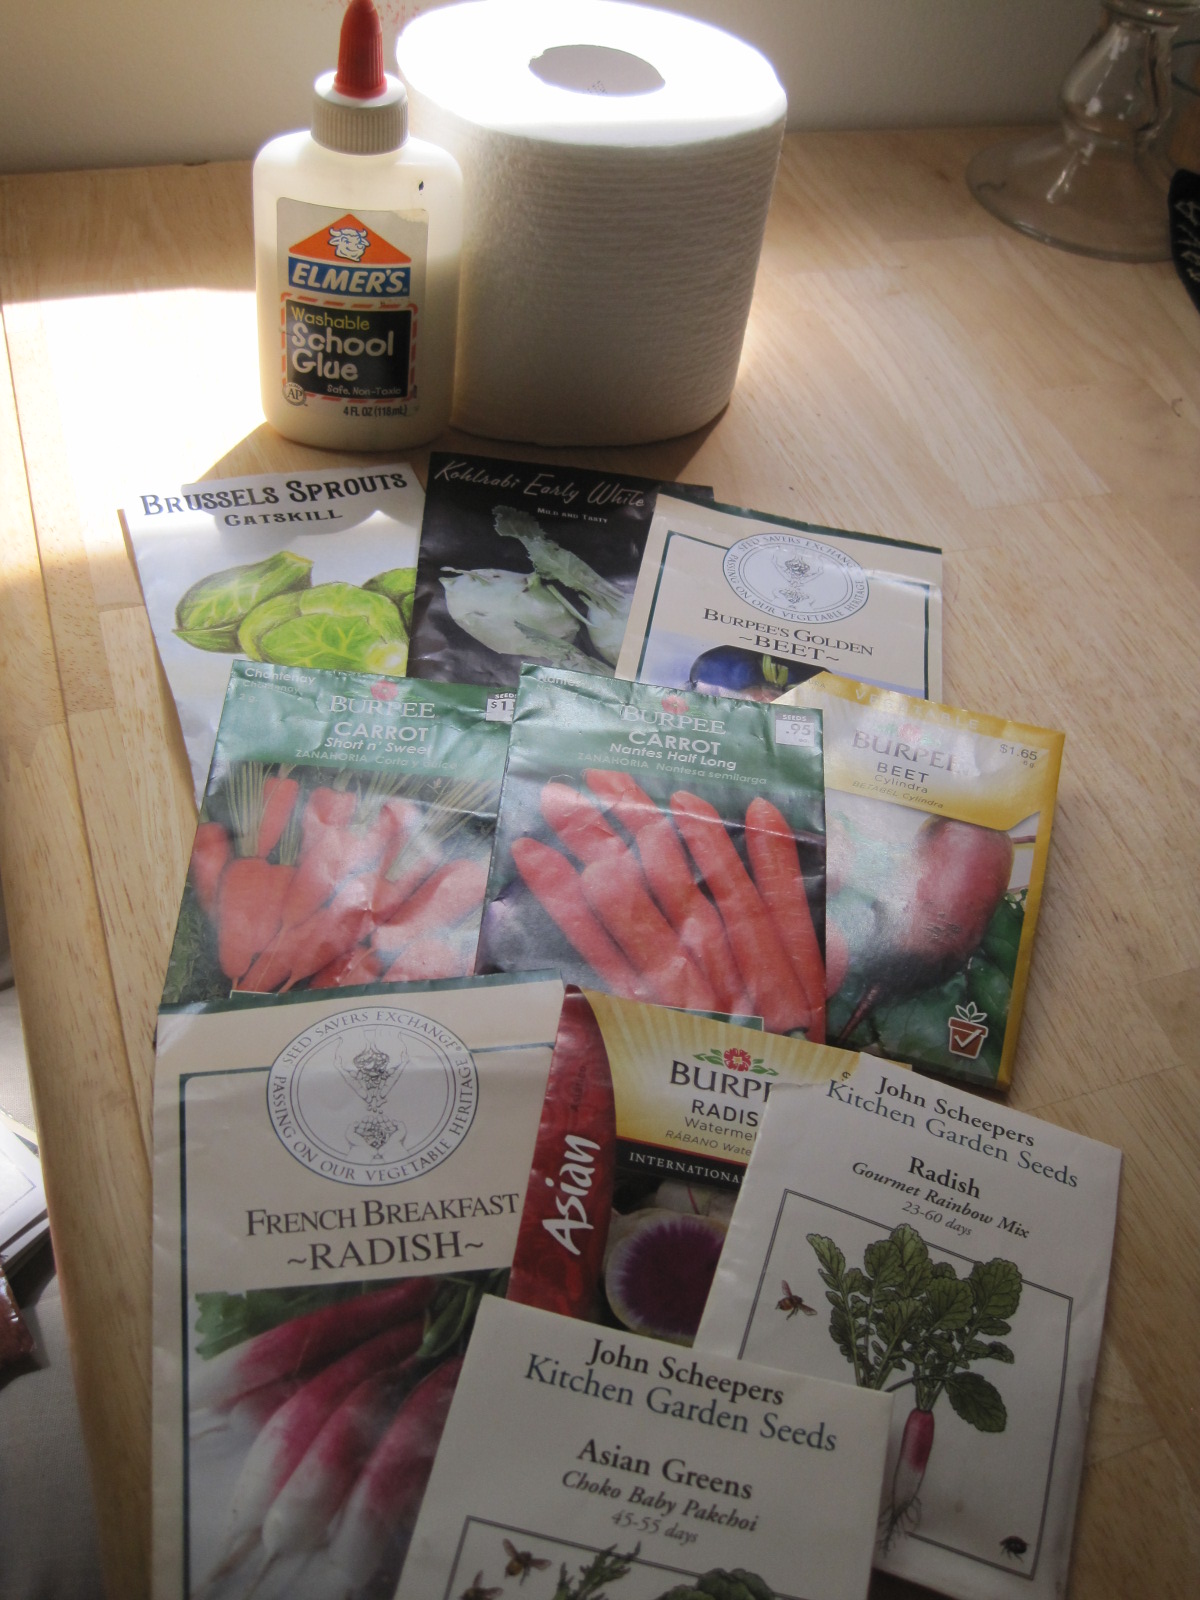
Step 3: Get out all your supplies for making seed tape.  Garden Betty's post pretty much covers what you need. The only extras I included were a ruler, a bowl for holding the seed and some tweezers for the really tiny seeds. I also got out my pop-up dry rack (you'll see why later).


Step 4: Pop in your headphones and start making your tape! Again, Garden Betty's instructions pretty much cover the waterfront but essentially, you start by cutting your TP to the correct lengths (based on your list). You can use 1-ply TP or split some 2-ply (which I did--very easy). Label each tape. You may also find it helpful to write down the planting depth information since you may not have the packets with you when you use the tape. Take your ruler and mark off the right intervals for the seed you are gluing (again use your list). You can just eyeball it if you are really good with measurements. Then start gluing and putting on the seeds at those intervals. Garden Betty did hers in a zig-zag but I did all of ours straight across.


Tip: I found the first time I did this that the glue soaks through quickly and can make the tape stick to your surface as you are still making tape. To make drying easier and prevent sticking to the table as I worked, I put my pop up dry rack next to me and fed the tape onto it as I worked. Then I readjusted the finished ones across the rack (taking care to make sure that the gluey parts were not on the poles).  Let dry overnight.


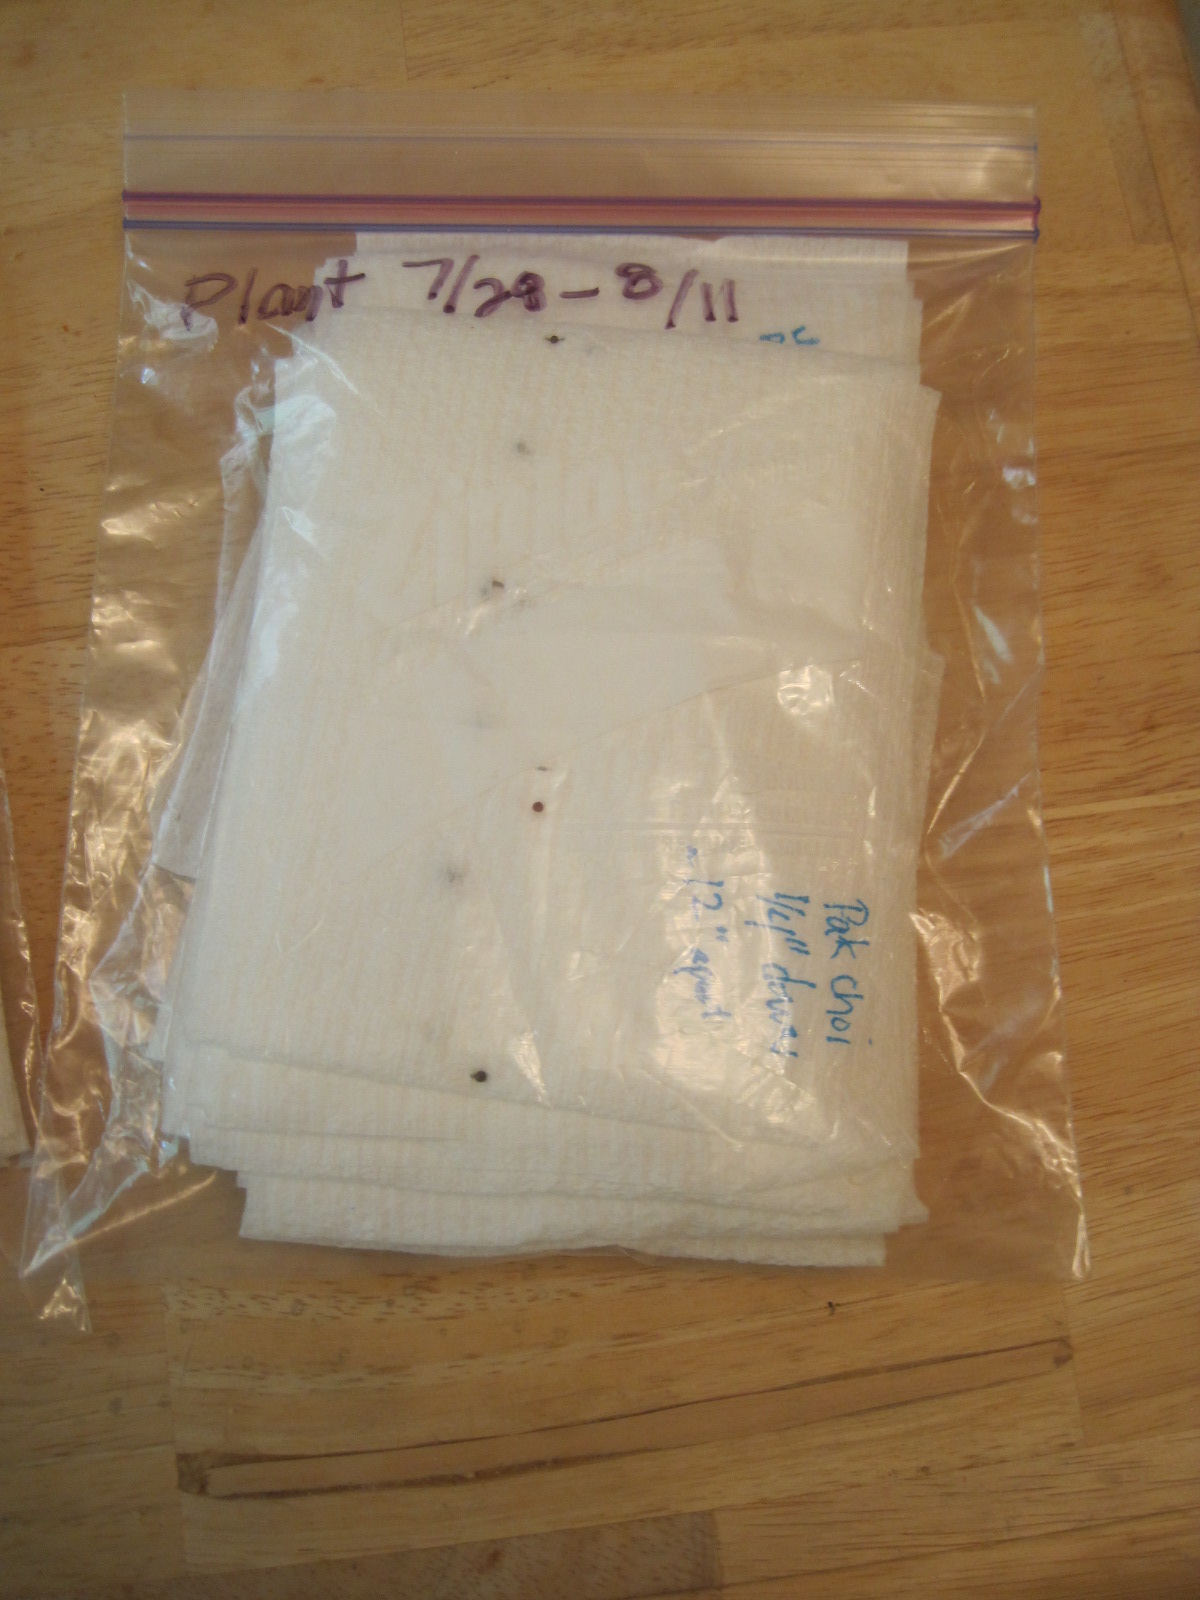
Step 5: Put your dry tape in a bag (preferably waterproof) and store the same way you store seed. If you have used a planting schedule you can mark your bags according to when the seeds should be planted and then divvy them up that way. I have ours separated this way according to our Fall Garden Plan.Then when you are going over to your community garden, you grab the bag for that week and you are good to go!


And that's it! We now have tape for all the seeds we plan to plant in our fall garden. Hopefully we won't be too tired to actually put them in. I would love to hear people's comments if this is helpful to you. Happy gardening!


Also featured on Simple Lives Thursday.

Saturday, July 7, 2012

The Horror: Japanese Beetles in My Garden

My poor raspberry

It has finally happened. After two years of knowing that our garden was tempting fate, the Japanese beetles have finally found us. I know I shouldn't be shocked.

Why? Because I realize that they are incredibly common garden pests in the mid-Atlantic/Northeast region, and I accept that community gardens tend to have more pests than backyard gardens because of the concentration of tempting treats. Somehow up until now we have been untouched; we have had every-other-garden-pest known to man, but we have never had these and I can't help feeling somehow let down by the garden fates. Haven't we suffered enough? 

A little background:

For those of you not familiar, the Japanese beetle or Popillia japonica was *accidentally* introduced to the US in the first part of the 20th century, likely through infected root stocks imported from Japan. It is fairly easily identified because of its iridescent coloring and little white "tufts" along the sides. They are dreaded by gardeners and farmers all over the US due to the widespread damage they cause. In 2008 alone they were estimated  to have caused as much as $450 million in damages to US agriculture, according to the U.S. Department of Agriculture.

Why are they so dreaded? Well, the upshot is that these are not very picky bugs that feed on a whole host of garden goodies. They are crappy fliers but they have good vision and a strong sense of smell which they put to use to seek out new food sources including a crazy-wide variety of flowers and many things in our garden like tomatoes, raspberries, peppers, blackberries. As they feed they skeletonize the plants' leaves which can  irreparably damage the plant. To make matters worse, they use that great sense of smell to find each other. The ladies put out a pheromone that attracts males to same site so they can get it on and make oodles of grubby babies (literally) which go after turf and lawns. Thus they are damaging as babies and as adults.

What do we do? Right now, there isn't much we can do. Traps apparently do not work well, and we found the beetles in our garden to late to interrupt the larval stage. Supposedly the kaolin clay will help and we may try some prophylactic applications of the surround-at-home protectant but whether we can keep it up enough to stem the tide is debatable. I only really only care about damage to my tomatoes, which are unfortunately right near the raspberries.  For now we will have to hope the garden muses are on our side. Maybe this beetle was just stopping by on it's way to our neighbor's grapes?

Additional Reading:

  • On an interesting note I found this cool 2008 Science Daily article describing great strides that an entomology professor at UC Davis has made into research of the beetles' sex pheromones. He has isolated, identified, cloned and express a pheromone-degrading enzyme that could be manipulated to keep males from finding and mating with females, thus interfering with their life cycle. While this doesn't help us right now I'm glad someone is working on the larger issue for American agriculture.  
  • Colorado State University Extension Service Fact Sheet on Japanese Beetle


Thursday, July 5, 2012

How to Make Your Own Chamomile Tea


 As we have chronicled in previous posts, our chamomile did really well this year (until its demise in early June--likely from excessive heat). Now all that is left is to make tea.

Process: Plant some chamomile seeds in the spring. When your plant starts to flower, wait til the leaves are fully extended outward and then go through and hand harvest as many as you need. This step of removing the flower heads is sometimes called "deadheading." (I admit that by the end this year we were harvesting flowers that weren't completely ready but it didn't seem to make a big difference.) You will have to separate the flowers from the stems which can be rather tedious but is no hard to do.

Drying: Spread the flowers out on a foil lined baking sheet and leave it out somewhere with good airflow. Make sure the place you choose isn't too damp or cool.  I just left them on my kitchen table. After about a week they should be dry enough for tea.

Storage and Usage: You can then either store the flowers whole  (recommended) in a glass jar or you can crush them. Storing and brewing them whole or crushing as needed will allow the tea to maintain more of its oils, keeping it fresher longer since the oils in the flowers are released a bit when crushed. (For a greater discussion of size of tea in relation to taste and brewing I found the Harney & Sons site very helpful).

We opted for crushing dried flowers with our finger tips to make a better comparison with commercial bag tea and ended up with enough tea to fill a Ball pint size canning jar all the way to the top. Store in a glass jar with a tight fitting lid and out of direct sunlight, like a pantry. In hindsight (and after reading the Harney & Sons page months later) I regret crushing it and will probably not do so in the future.

When you are ready to use, put the tea in a tea strainer and pour almost boiling water over. Let steep for 2-3 minutes. You can also can put it directly in a cup and brew and then pour it into a strainer over another cup. In retrospect, the latter method would have worked better for us .

Comparison: Here is what our crushed tea looks like:


Here is commercial chamomile--Stash Organic Chamomile brand--(left) compared to our tea (right). You can see that the commercial tea is ground really finely :


and here is my first cup of our chamomile:


Verdict: Our tea smells AMAZING whereas the commercial organic chamomile has barely any scent at all. Likely because it is already crushed AND has been sitting in that little pouch for goodness knows how long. Ours is not as finely ground but even so it was too fine for our IKEA tea diffuser to completely contain it all and little bits of chamomile escaped. It tasted lovely though. Only job now is to find a finer mesh diffuser or remember to do the two cup method.

Hope this is helpful. Please leave any comments you may have as they are always appreciated! :)


Also featured on Simple Lives Thursday.

Monday, July 2, 2012

Planning the Fall Garden


I have the hardest time every year planning the fall garden and knowing when to start it. This year I also have to decide what to start under the row cover and what to start in the open bed since bugs are still a problem at the height of the summer (and I swear the bugs are more aggressive in the community garden).  Luckily I found this really great guide from simplebites that I used to make a schedule for us (below). According to it, we need to get busy this week with our first fall sowing!

When the first frost approaches in earnest we will switch out the row cover for plastic sheeting so that we can keep growing for a bit.

Here is the plan right now:

Planting List:

Brassicas:           
Brussels Sprouts- Baker Creek-OP 
Kohlrabi, Early White Vienna – Baker Creek - OP
Choko Baby Pakchoi – John Scheepers – 45 – 55 days
Onions:
Onions, Yellow Granex Sweet – John Scheepers – 150 days
Shallots, Ambition – 100 days
Root Vegetables:
Beets, Burpee Golden – SSE – 55-60 days
Beets, Cylindra - Burpee - 60 days
Carrot, Nantes Half Long - Burpee - 70 days (sow for fall)
Carrot, Short n' Sweet Chantenay - Burpee - 68 days (sow for fall)
Parsnip, Hollow Crown- Burpee – OP- 105 days
Radish, French Breakfast – SSE – OP – 30 days       
Radish, Asian Watermelon - Burpee - 35 days 
Radish, Gourmet Rainbow Mix - John Scheeper- 23-30 days 
Turnip, Purple Top White Globe – SSE -  45-65 days 
Turnip, Golden Globe - Baker Creek 
Salad:
Lettuce, Burpee Bib (butterhead)- Burpee 75 days
Lettuce, Parris Island Romaine – Ferry Morse – OP-68 days
Lettuce, Tennis Ball (butterhead)- SSE
Lettuce Mix, Lovely Lettuce Mesclun Blend (Little Gem baby romaine, curly Tango, cheeky red Lolla Rossa, crispy Summertime, Brunia red oakleaf, buttery Rouge Grenobloise and Merveille des Quatre Saisons) - John Scheepers - OP-30-40 days
Mustard Greens – Baker Creek
Japanese Giant Red Mustard Greens - Baker Creek

Planting Schedule:

For our zone (7a) first frost date is tentatively Oct 15th.

12 to 14 weeks before your first frost (Plant July 1-14th)
  • Direct-sow beans, parsnips, brassicas and begin planting lettuce and radishes.
10 to 12 weeks before your first frost (Plant July 14-28th)
  • Direct-sow beets, carrots, leeks and scallions, along with more lettuce and radishes.
8 to 10 weeks before your killing frost (Plant July 28th-Aug 11th)
  • Direct-sow lettuce, turnips, spinach, mustard, pakchoi and other Asian greens.
  • Sow more radishes
6 to 8 weeks before first frost (Plant Aug 11th- 25th)
  • Make a final sowing of lettuce beneath a protective tunnel or frame.
On or around your first killing frost date ( Plant in September)
  • Every fall garden should include garlic and shallots to be harvested in the Summer of the next year 

Sunday, July 1, 2012

Green Beans Make My Heart Sing

Sadly none of our garden chores got done since we had a huge storm Friday night whose aftermath occupied much of our weekend. But hubby did make it over to the garden today to check on things and lo and behold there were even more beans to harvest. Clearly my fears about whether they really do self-pollinate were unfounded.  We harvested almost 2 lbs of green and wax beans! (Which again is a big deal for us).


However, we are coming to find that those who have never dealt with the Mexican bean beetle do not understand why we are so excited by this year's success and the vigorous health of our plants. So below I have a comparison of our plants this year and last year and you can see for yourselves why we are so jubilant.


2011 bean plants after about 2 weeks of Mexican bean beetle carnage (if you zoom you can even see larval and full grown bean beetles on the plant still):


2012 bean plants (with row cover):


Wouldn't you be excited too??